
Blog
Freezing Bubbles: The Complete Guide to Creating Stunning Ice Crystal Spheres

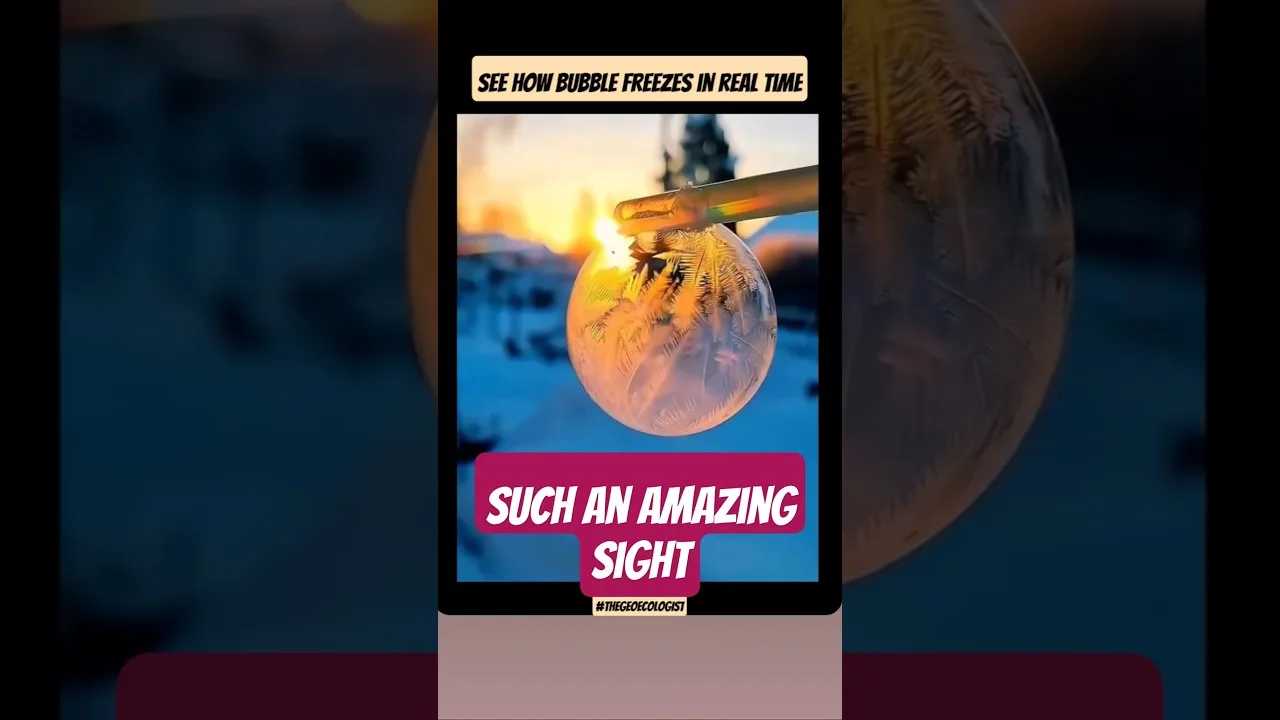
Table of Contents
- The Science Behind Freezing Bubbles
- Molecular Structure of a Soap Bubble
- Nucleation and Crystal Growth
- Thermodynamics of the Phase Transition
- Optimal Conditions for Freezing Bubbles
- Temperature Requirements
- Humidity and Wind Considerations
- Surface Selection
- Step-by-Step Guide to Create Freezing Bubbles
- Preparing the Bubble Solution
- Equipment and Setup
- Technique for Consistent Results
- Photography Tips for Capturing Frozen Bubbles
- Camera Settings and Lens Choice
- Lighting Strategies
- Composition and Timing
- Safety Considerations and Environmental Impact
- Personal Safety in Extreme Cold
- Solution Safety and Cleanup
- Environmental Considerations
- Educational Applications and Scientific Value
- Classroom Demonstrations
- Citizen Science Opportunities
- Advanced Research Connections
- Troubleshooting Common Issues
- Bubbles Popping Before Freezing
- Crystals Not Forming or Forming Poorly
- Bubbles Freezing Too Fast (Instant Opaque White)
- Creative Variations and Artistic Exploration
- Colored Freezing Bubbles
- Giant Freezing Bubbles
- Frozen Bubble Clusters
- Conclusion
Freezing bubbles represent one of nature’s most mesmerizing winter phenomena, transforming ordinary soap films into delicate crystalline masterpieces within seconds. When temperatures plummet below freezing, the thin water layer sandwiched between soap molecules begins to crystallize, creating intricate fractal patterns that spread across the bubble’s surface like lace. This captivating process combines physics, chemistry, and artistry, making it a favorite subject for photographers, science educators, and winter enthusiasts alike. Understanding the science behind freezing bubbles not only enhances appreciation for this natural spectacle but also improves success rates for those attempting to create their own frozen spheres.
- Freezing bubbles form when soap films crystallize at temperatures below 32°F (0°C), creating intricate ice crystal patterns
- Optimal conditions include temperatures below 15°F (-9°C), low wind, and high humidity for best results
- Commercial bubble solutions work, but homemade recipes with glycerin or corn syrup produce more durable films
- Photography requires fast shutter speeds, macro lenses, and strategic lighting to capture crystal formation
- The phenomenon demonstrates nucleation, crystallization, and thermodynamics in real-time
The Science Behind Freezing Bubbles
Molecular Structure of a Soap Bubble
A soap bubble consists of three layers: an outer layer of soap molecules, a middle layer of water, and an inner layer of soap molecules. The soap molecules (surfactants) arrange themselves with hydrophobic tails facing outward and hydrophilic heads facing the water layer. This sandwich structure creates surface tension that allows the bubble to maintain its spherical shape. When freezing bubbles begin to crystallize, the water layer undergoes a phase transition from liquid to solid, disrupting this delicate equilibrium.
Nucleation and Crystal Growth
The freezing process initiates through nucleation—where water molecules organize into a crystalline structure. In freezing bubbles, nucleation typically begins at the bubble’s base where it contacts a cold surface, or at microscopic impurities within the soap film. Once nucleation occurs, ice crystals grow rapidly across the water layer, following the hexagonal crystal structure of ice. The crystals appear as feathery, fern-like patterns that radiate outward, creating the characteristic “snow globe” effect. Research from the University of Cambridge’s Fluid Dynamics Laboratory has shown that crystal growth velocity depends on temperature gradient and film thickness.
Thermodynamics of the Phase Transition
As freezing bubbles solidify, latent heat is released during the water-to-ice transition. This exothermic process momentarily warms the bubble’s surface, creating a visible thermal signature detectable with infrared cameras. The soap layers remain largely unaffected initially, but as ice crystals expand, they disrupt the surfactant arrangement, eventually causing the bubble to collapse or become a permanent frozen shell. The entire process typically completes within 10-30 seconds depending on ambient conditions.
Optimal Conditions for Freezing Bubbles
Temperature Requirements
While freezing bubbles can form at any temperature below 32°F (0°C), the most spectacular crystallization occurs between 0°F and 15°F (-18°C to -9°C). At these temperatures, crystallization happens slowly enough to observe but quickly enough to maintain bubble integrity. Above 25°F (-4°C), the process becomes sluggish and bubbles often pop before fully freezing. Below -20°F (-29°C), bubbles freeze almost instantly, sometimes shattering rather than forming delicate patterns.
Humidity and Wind Considerations
High humidity (above 60%) slows evaporation from the bubble film, giving crystals more time to develop. Low wind conditions are essential—even gentle breezes can rupture the fragile film before freezing completes. Early morning hours often provide the calmest air and lowest temperatures. Many successful photographers recommend attempting freezing bubbles within two hours of sunrise when atmospheric conditions are most stable.
Surface Selection
The surface upon which a bubble lands significantly affects freezing behavior. Cold, textured surfaces like snow, frost-covered glass, or chilled metal provide nucleation sites and thermal conductivity that promote even crystallization. Smooth, hydrophobic surfaces may cause bubbles to roll or pop before freezing. Some enthusiasts pre-chill ceramic tiles or metal plates in the freezer for controlled experiments.
Step-by-Step Guide to Create Freezing Bubbles

Preparing the Bubble Solution
Commercial bubble solutions work adequately, but custom formulations yield superior results for freezing bubbles. A proven recipe combines 200ml distilled water, 50ml dish soap (Dawn Ultra performs consistently), 25ml glycerin (available at pharmacies), and 15ml light corn syrup. The glycerin and corn syrup increase viscosity and reduce evaporation, creating thicker films that withstand freezing stresses better. Allow the mixture to rest for at least 24 hours before use—this eliminates foam and allows surfactants to fully hydrate.
Equipment and Setup
Essential equipment includes: bubble wands (larger diameters create more impressive spheres), a thermometer, insulated gloves, and a darkened background for visibility. For photography, a macro lens (90-105mm), tripod, and off-camera flash with diffuser are recommended. Position your setup in a sheltered location—a garage doorway, covered porch, or windbreak created from plywood works well. Ensure your background is at least 3 feet behind the bubble zone to achieve pleasing bokeh.
Technique for Consistent Results
Dip the wand completely, allowing excess solution to drain for 2-3 seconds. Hold the wand at a 45-degree angle to the wind (if any) and blow gently to form a single large bubble rather than multiple small ones. Guide the bubble onto your pre-chilled surface rather than letting it free-fall. Once landed, step back immediately—body heat and breath can disrupt the delicate thermal equilibrium. Observe silently; the first crystals typically appear at the contact point within 5-15 seconds.
Photography Tips for Capturing Frozen Bubbles
Camera Settings and Lens Choice
For freezing bubbles photography, a 1:1 macro lens is ideal, though extension tubes on a standard 50mm lens work for beginners. Shoot in RAW format for maximum dynamic range. Recommended settings: ISO 100-400, aperture f/8-f/11 for sufficient depth of field, shutter speed 1/200s or faster to freeze crystal growth. Manual focus is essential—autofocus struggles with transparent subjects. Pre-focus on the wand tip, then switch to manual before blowing bubbles.
Lighting Strategies
Backlighting reveals the internal crystal structure most dramatically. Position a flash behind and slightly below the bubble, aimed upward through a diffuser. A white foam board reflector in front bounces fill light into shadow areas. For video, continuous LED panels with adjustable color temperature (5600K for daylight balance) provide consistent illumination. Avoid direct sunlight—it creates harsh highlights and accelerates melting.
Composition and Timing
Frame the bubble off-center using the rule of thirds, leaving negative space in the direction of crystal growth. The most photogenic moment occurs when crystals have covered 40-60% of the surface—this shows both the clear soap film and the crystalline pattern. Burst mode (8+ fps) captures the progression. For time-lapse, interval shooting at 1 frame per second played back at 24fps compresses 30 seconds of freezing into 1.25 seconds of footage.
Safety Considerations and Environmental Impact
Personal Safety in Extreme Cold
Creating freezing bubbles often requires prolonged exposure to sub-zero temperatures. Dress in layers with moisture-wicking base layers, insulated mid-layers, and windproof outer shells. Insulated waterproof boots, thermal gloves with touchscreen-compatible fingertips, and a warm hat are essential. Watch for frostbite signs: numbness, white/grayish skin patches, or waxy-feeling skin. Take warming breaks every 20-30 minutes. Never touch metal surfaces with bare skin at temperatures below 10°F (-12°C).
Solution Safety and Cleanup
While bubble solutions are generally non-toxic, they can create slip hazards on walkways and steps. Avoid blowing bubbles over high-traffic areas. The glycerin-corn syrup mixture is biodegradable but sticky—clean surfaces with warm water afterward. Keep solutions away from pets; while not poisonous, ingestion can cause gastrointestinal upset. Store leftover solution in labeled containers away from food items.
Environmental Considerations
Freezing bubbles leave no persistent environmental residue—the soap film sublimates or melts harmlessly. However, avoid using commercial solutions with plastic microbeads or non-biodegradable additives near waterways. The EPA Safer Choice program certifies environmentally preferable cleaning products, including some dish soaps suitable for bubble solutions. Choosing certified products minimizes ecological impact.
Educational Applications and Scientific Value
Classroom Demonstrations
Freezing bubbles provide an engaging platform for teaching phase transitions, crystal nucleation, surface tension, and thermodynamics. The visual nature appeals to diverse learning styles. Elementary students can observe and describe patterns; middle school students can measure freezing times at different temperatures; high school physics classes can calculate latent heat release using infrared thermometers. The National Science Teaching Association features frozen bubble experiments in their winter curriculum guides.
Citizen Science Opportunities
Enthusiasts can contribute to scientific understanding by documenting freezing bubble behavior under varying conditions. Variables to record include: temperature, humidity, wind speed, solution recipe, bubble diameter, freezing duration, and crystal pattern morphology. Platforms like iNaturalist and SciStarter occasionally host winter physics observation projects. Consistent documentation across geographic regions could reveal regional atmospheric influences on crystallization patterns.
Advanced Research Connections
The study of freezing bubbles intersects with materials science, particularly in understanding thin-film crystallization relevant to semiconductor manufacturing and anti-icing coatings. Research published in Physical Review Fluids (2021) used high-speed imaging of freezing bubbles to validate models of crystal dendrite growth in confined geometries. These insights inform development of ice-phobic surfaces for aircraft wings and wind turbine blades.
Troubleshooting Common Issues
Bubbles Popping Before Freezing
If bubbles burst within seconds, the film is too thin or evaporation is too rapid. Increase glycerin concentration to 30ml per 200ml solution. Ensure solution has rested 24+ hours. Work in higher humidity (>70%) or mist the air lightly with a spray bottle before starting. Avoid direct sunlight and wind. Larger wands (4-6 inch diameter) create thicker films that last longer.
Crystals Not Forming or Forming Poorly
Insufficient supercooling is the usual culprit. Verify ambient temperature is below 15°F (-9°C) at bubble level—ground temperature can be several degrees warmer than air temperature. Ensure your landing surface is pre-chilled below freezing. Touch the surface with a thermometer probe. If using snow, compact it firmly to create a solid, cold platform. Fresh powder snow insulates rather than conducts cold.
Bubbles Freezing Too Fast (Instant Opaque White)
At temperatures below -20°F (-29°C), crystallization outpaces pattern formation. Try warming your solution slightly (keep in inner pocket for 10 minutes) to reduce thermal shock. Blow smaller bubbles—they have less thermal mass and freeze more uniformly. Some photographers intentionally seek this “snowball” effect for abstract imagery.
Creative Variations and Artistic Exploration
Colored Freezing Bubbles
Adding food coloring (2-3 drops per 200ml) creates tinted crystals. Blue and purple produce icy aesthetics; red and orange create striking contrast against snow. Note that dyes can alter freezing dynamics—test small batches first. Powdered tempera paint (1/8 teaspoon) yields more intense colors but may clog wand mesh. Strain through fine mesh if needed.
Giant Freezing Bubbles
Using a tri-string wand (two handles with a loop of cotton string) creates bubbles 12-24 inches diameter. These require two people and calm conditions. The larger surface area displays more complex crystal interactions. Giant freezing bubbles often develop multiple nucleation sites, creating collision zones where crystal fronts meet—these boundaries produce unique geometric patterns.
Frozen Bubble Clusters
Blowing multiple bubbles onto the same cold surface creates clusters that freeze together. Where bubbles touch, crystal bridges form between them. This mimics natural frost formation on vegetation. Clusters of 3-7 bubbles create compelling compositions. Use a straw for precise placement of smaller bubbles around a central large one.
Conclusion
Freezing bubbles offer a perfect intersection of accessible science and breathtaking beauty. Whether pursued for photography, education, or pure wonder, the process reveals fundamental physical principles in real-time. Success requires patience, preparation, and respect for winter conditions—but the reward of watching a delicate sphere transform into a crystalline jewel is unmatched. As you experiment with different temperatures, solutions, and techniques, you’ll develop an intuitive feel for the conditions that produce the most spectacular results. Share your discoveries with the growing community of freezing bubble enthusiasts, and consider contributing observations to citizen science initiatives. The next time winter brings deep cold, you’ll be ready to capture one of nature’s most ephemeral masterpieces.
Frequently Asked Questions
Freezing bubbles form best between 0°F and 15°F (-18°C to -9°C). At these temperatures, crystallization occurs slowly enough to observe intricate patterns but quickly enough to maintain bubble integrity. Above 25°F (-4°C), the process becomes too slow, and bubbles often pop before fully freezing.
A homemade solution of 200ml distilled water, 50ml dish soap (Dawn Ultra recommended), 25ml glycerin, and 15ml light corn syrup produces the most durable films. The glycerin and corn syrup increase viscosity and reduce evaporation, allowing bubbles to withstand freezing stresses better than commercial solutions alone.
Use a 1:1 macro lens (90-105mm), shoot in RAW at ISO 100-400, f/8-f/11, 1/200s+ shutter speed. Backlight with a diffused flash behind the bubble, use a reflector for fill light, and focus manually. The most photogenic moment occurs when crystals cover 40-60% of the surface. Burst mode captures the progression effectively.